
How to Create an Animated GIF Thumbnail
How to Create an Animated GIF Thumbnail Introduction I received a great email from my friend, Rufus the other day. He makes a YouTube series
Vidds is a simple but powerful editing tool, so it makes sense that we’d have tools for trimming and cutting up videos online – create clips from your videos, or cut videos into multiple segments to play back different parts. It’s amazing how much you can accomplish, all in your web browser!
In this tutorial, we’ll go over beginner to advanced options to play back clips from your videos.
And, as always, while you can use Vidds to make a trimmed version of an existing video, you can also use Vidds to add text and image overlays, use your video clip as an overlay on top of other content and backgrounds, and do cool stuff like add intro and outro sequences!
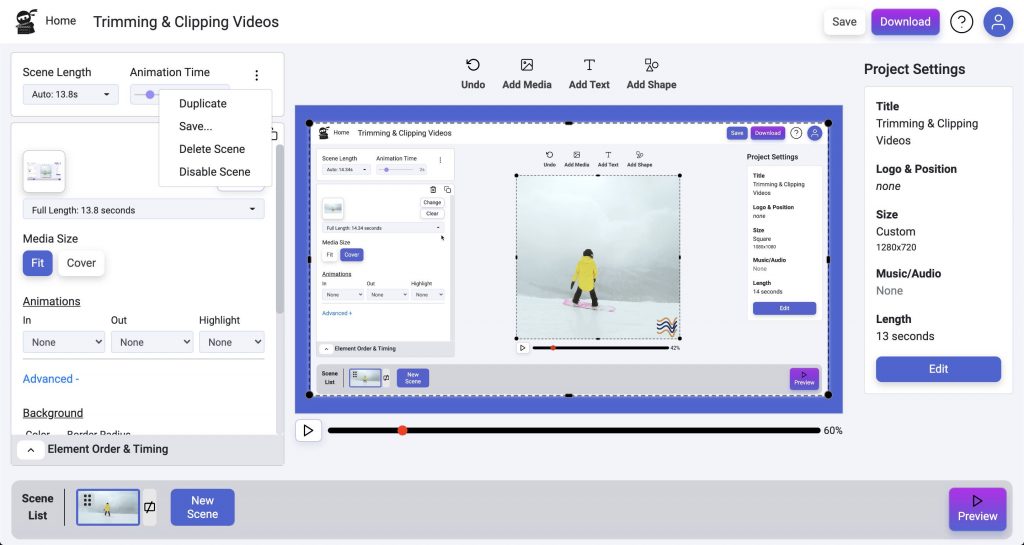
When you select a video in Vidds, you can choose from 3 different playback methods:
We have the options to support a variety of use cases. Auto playback is great for backgrounds and stylistic elements, full is perfect if it’s your primary content and you want to play it all. Custom Clips take a little more work, but allows you to select a specific part of the video to play.
You can also use the Media Size option to choose how the video is displayed. Use “Fit” if you want to make sure the entire video is displayed, and “Cover” if you want to crop it to fit into the area.
It’s pretty easy to trim your video to play back just the part you want.
That’s it! You’re all set with the new, clipped video.
A single clip is usually perfect for most people, but sometimes you need more. Maybe you recorded a long video and want to cut out all but a couple parts. The great news is, Vidds can do this just as well as it can create a single clip!
To add a second clip, resulting in them being cut together, all you need to do is click the “Add Scene” button at the bottom, choose a layout or select “Create Your Own,” add your video to it, and select the second clip using the same steps you used above.
Not easy enough? There’s a simpler option!
You can also go to the scene settings, click the 3 dots, and select “Duplicate.” Now, you just have to select the video element, select the “Custom Clip & Speed” option, and update the clip to the new position, and you’re done!
You can repeat these steps and add as many scenes as you need to cut as many parts of your video together as you need.
That’s all there is to trimming videos or cutting them together.
But just a reminder: Vidds is powerful, and you can do a lot more with it. Here are some ideas to spice up your video and give it some additional production value:
Add Intro/Outro scenes.
You can add scenes at the beginning and end to show a little about what’s in the video and add your branding and logo.
Add interstitial scenes.
If you need to cut to different parts of the video, you can add scenes and move them between your clips and cuts. You can use them before cutting to different sections of a video.
Use a custom layout.
In the examples above, we mostly covered the entire video. But you can adjust the size and position of the video, add text or logo/image overlays, or add a background color or image. We also have shapes if you just want to make it look a little nicer or cover up some video blemishes!
How to Create an Animated GIF Thumbnail Introduction I received a great email from my friend, Rufus the other day. He makes a YouTube series
How to Add Scene Transitions Adding scene transitions to your videos is a piece of cake with Vidds, simply follow the steps below to find
How To Animate Text in Videos How to Animate Text in Videos with Vidds Animating text in Videos is one of the most common reasons
| Cookie | Duration | Description |
|---|---|---|
| cookielawinfo-checbox-analytics | 11 months | This cookie is set by GDPR Cookie Consent plugin. The cookie is used to store the user consent for the cookies in the category "Analytics". |
| cookielawinfo-checbox-functional | 11 months | The cookie is set by GDPR cookie consent to record the user consent for the cookies in the category "Functional". |
| cookielawinfo-checbox-others | 11 months | This cookie is set by GDPR Cookie Consent plugin. The cookie is used to store the user consent for the cookies in the category "Other. |
| cookielawinfo-checkbox-necessary | 11 months | This cookie is set by GDPR Cookie Consent plugin. The cookies is used to store the user consent for the cookies in the category "Necessary". |
| cookielawinfo-checkbox-performance | 11 months | This cookie is set by GDPR Cookie Consent plugin. The cookie is used to store the user consent for the cookies in the category "Performance". |
| viewed_cookie_policy | 11 months | The cookie is set by the GDPR Cookie Consent plugin and is used to store whether or not user has consented to the use of cookies. It does not store any personal data. |