How to Use AI to Video Generator
How to Use AI to Video Generator Click “AI to Video” in the Automations section To use the Vidds AI Video Generator, click the “AI
When we launched Vidds earlier this year, we planned to provide monthly Vidds updates on our blog. It turns out launching, talking to users, and building what they want can be time consuming! 😛
We’ve been announcing new features in our newsletter, but haven’t kept up on the blog, so we decided to summarize all of the features since our launch in one big Vidds 2.0 update post!
Don’t be surprised if you notice a theme for these new features — they’re all focused on making video creation and editing easier, so you can spend less time while creating better videos!
There’s so much packed into this Vidds 2.0 update post, you might just want to read this TL;DR to see what’s relevant to you 😉
Need to knock out a quick social media post or create a quick promo? Check out our new QuickStart videos at the top of your dashboard!
These are curated videos ready for you to customize. Just click the “Start” button, customize text, media and colors in each scene, then download your new video!
Just like any video you create, these are fully customizable. You can change elements and styles, add or remove scenes, resize, and much more.
We hope this will help you jumpstart the creation process. Let us know how it goes and what kind of videos you like to post so we can work to create more templates for you!
Do you want a similar intro or outro in all of your videos? Have you created that perfect template for your main content? Awesome! Let’s get your existing scenes working harder for you!
If you’d like to reuse a scene in your other videos, just click the 3 dots in the upper left corner (next to “Scene Length” & “Animation Time”), then select Save and give it a name.
Now, whenever you add a scene to a video, you’ll see a list of your saved scenes so you can add them in!
Sometimes one background audio track isn’t enough. You might need to have music and a voiceover. Well, now you can easily do that with our multiple audio tracks feature. Simply click “add audio track” in the project settings section and then select which tracks you want to use (choose from stock or upload your own), then simply set the volume and you’re good to go.
Video creation with Vidds gets better with every new feature, and this is a good one. We released 6 new scene transitions which you can add between scenes for a more dynamic, polished look to your videos!
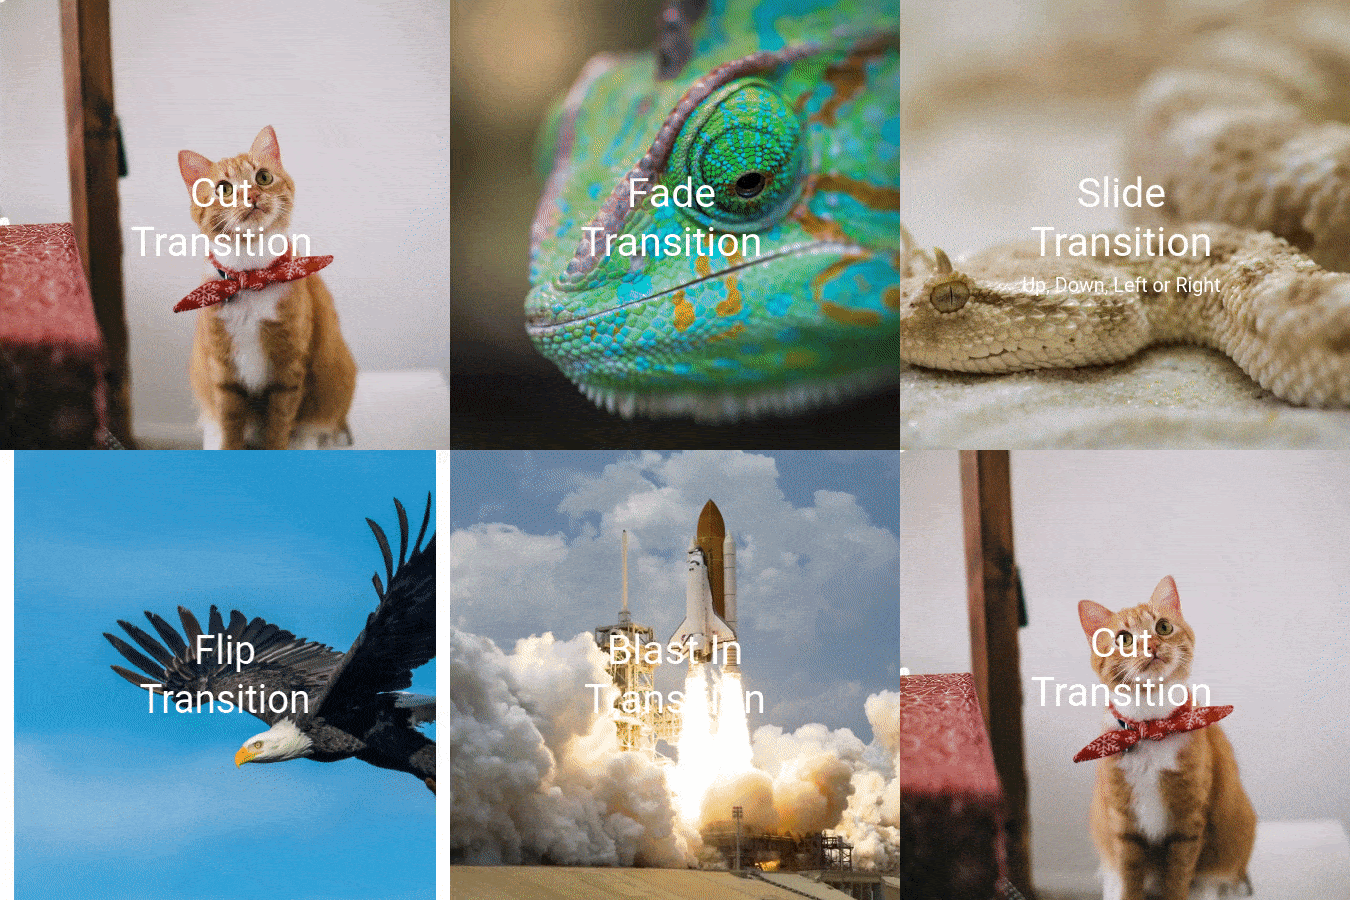
Add transitions by clicking the icon between scene thumbnails in the Scene List. Then select the transition that you’d like to use and set the speed by clicking the gear icon to fine tune the look a feel.
1. Cut
The most common transition in video editing is the cut or “jump cut” where you move directly from one scene to the next without any effects.
2. Fade
The popular and subtle “fade” transition blends the current scene with the next for a smooth transition from one to the other.
3. Slide
Choose from Up, Down, Left and Right for this awesome sliding transition!
4. Flip
For an exciting and dynamic transition use the “Flip” option, it will literally spin your world around (before putting it right again!).
5. Blast Out
This fast zoom out transition packs a punch and will bring any video to life.
6. Blast In
Cousin of the Blast Out, the Blast In offers a fast zoom in transition – they naturally work well together for a great outcome.
One of our more complex technical improvements, we built a new render backend to speed up the process and make it more reliable.
The new renderer is awesome and speeds up the export time for all videos, but it really begins to shine when videos are a minute or more in length, where it can improve render times by up to 10x!
We had a pretty limited set of background audio tracks. It was difficult to find one that fit, both because of the limited list, and the interface wasn’t easy to navigate.
This update means we’ve now doubled the size of our music library! We made a concerted effort (pun intended) to broaden the selection of music. To improve the experience of adding music to your videos, we’ve included both genre and mood filters to help you find exactly what you’re looking for!
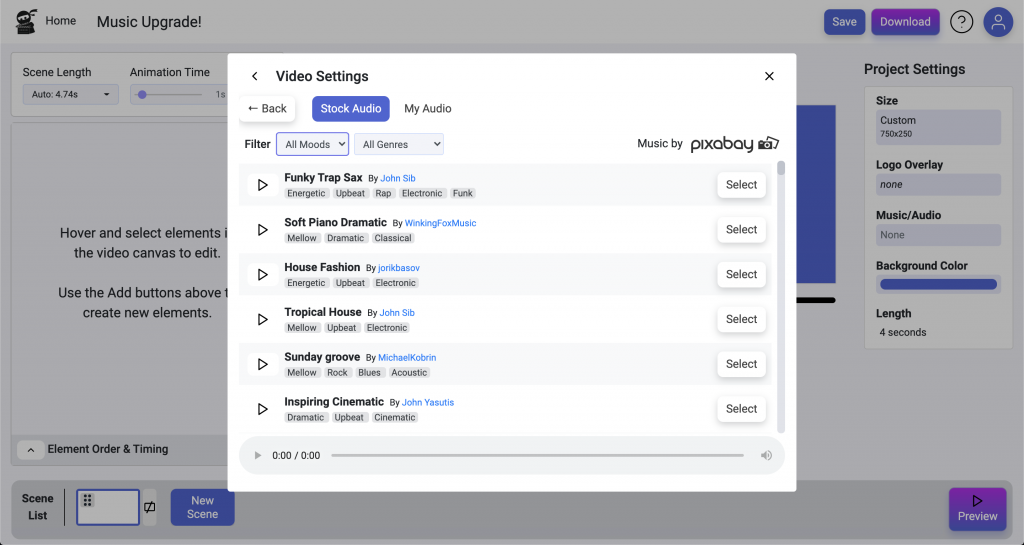
But that’s not all! You can now add stock music directly in your scenes by clicking the “Add Media” button and choosing “Stock Audio” to access the list. That means you can put a short music clip in a single scene.
Don’t forget that you can also add multiple background audio tracks if you’d like to have a voice over and music 🙂
If you create videos often, you know how hard it can be to keep a consistent look and feel for each element and between scenes. To help with this, we just launched Brand Kits in Vidds, and it’s crazy easy to get started!
When editing a video, just click the “Brand Kit” option in the Project Settings section on the right. Next, click “Create New Kit”, then select the fonts and colors you’d like to use. Yep, it’s that easy!
Once you’ve done that, new elements you add will automatically use your brand selections! And once you’ve created a brand kit, you can use it in all of your future videos 🙂
Brand kits even work on the library of Vidds’ pre-designed templates!
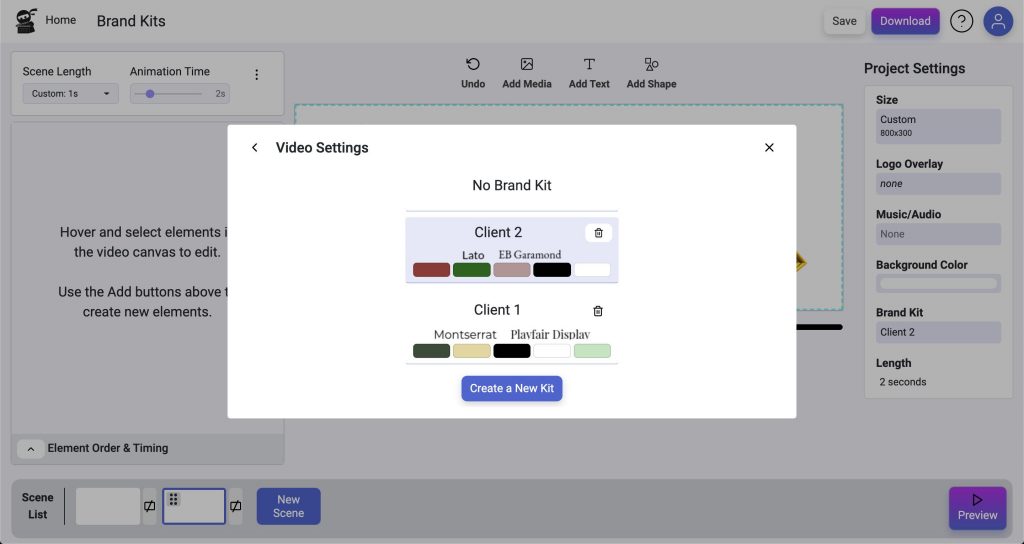
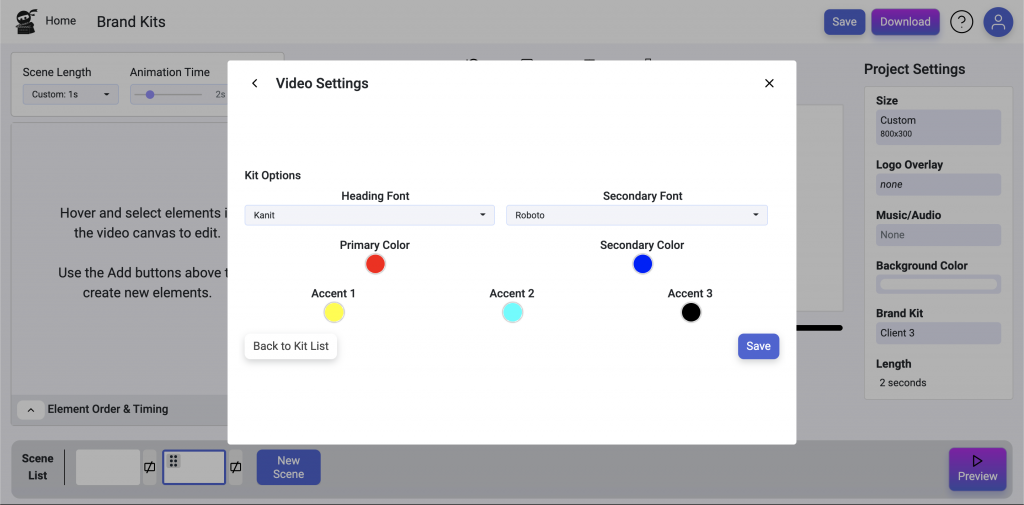
What is a brand kit? In Vidds, it gives you a Heading font, a Regular font, and 5 colors: Primary (text), Secondary (highlights/background), and 3 accents. Those are recommended uses, but you can swap and use them any way you see fit!
Your older videos will not automatically apply brand kits, but your new ones will.
If you’ve applied a brand kit to your video, but want to retain the original style of a template you add, you can just click the 3-dot menu and choose “Disable Branding” to disable it just for the one scene.
You can create multiple brand kits and switch between them in any video. This is great for subtle differences, dark mode, or working with multiple brands.
You can edit your brand kit fonts and colors at any time. Once you save the changes, it will apply to all videos that use that kit!
Even if you’re using a brand kit, you can still change the fonts and colors of individual elements any time you need to. Brand kits are an extension, and they’re not meant to lock you into the 2 fonts and 5 colors provided.
You can also disable branding for a video by selecting “No Brand Kit”
It’s official. We’ve launched an affiliate program for Vidds users. This means rewards in return for every referral that signs up to a paid Vidds plan!
You can contact us to join the program!
An affiliate program is important to us as it’s a way to give back to the Vidds community as we continue to grow and develop our product.
We added some new animations. These are “Highlight” animations, so they happen while your elements are in view and can help add character and movement to your scenes.
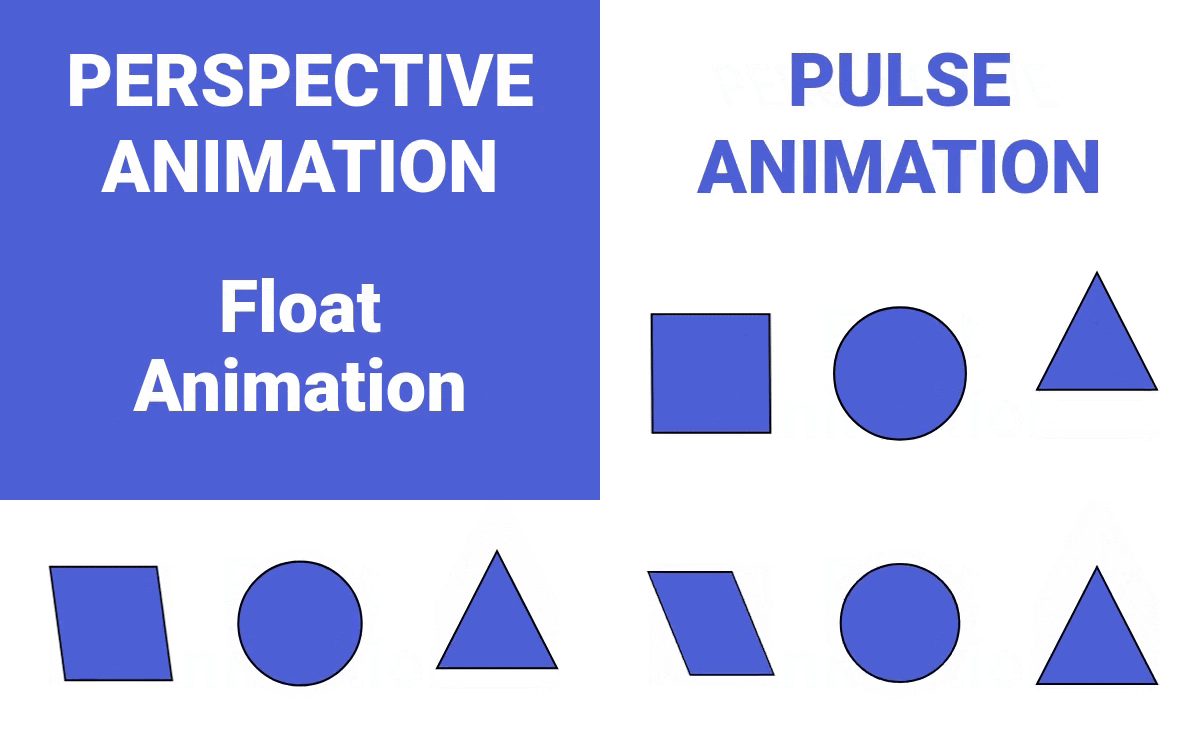
– Perspective: Add a 3D aspect to your elements!
– Float: This was our first “repeating” animation. Choose this to have your element float up and down slowly, great for drawing attention to text or giving background elements some motion.
– Pulse: Similar to the repeating Float animation, this animation repeats slowly, but grows and shrinks in-place, giving you more options for drawing attention to an element.
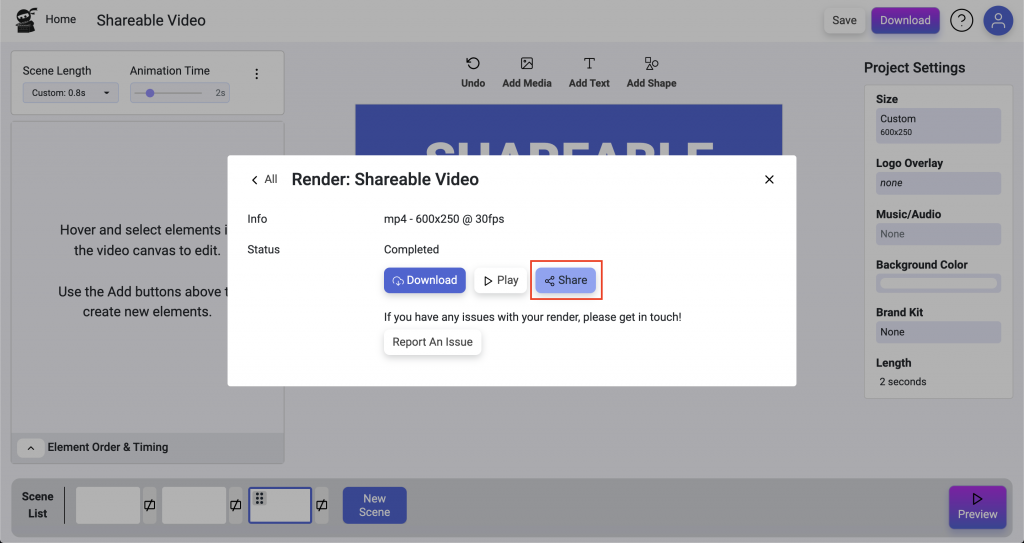
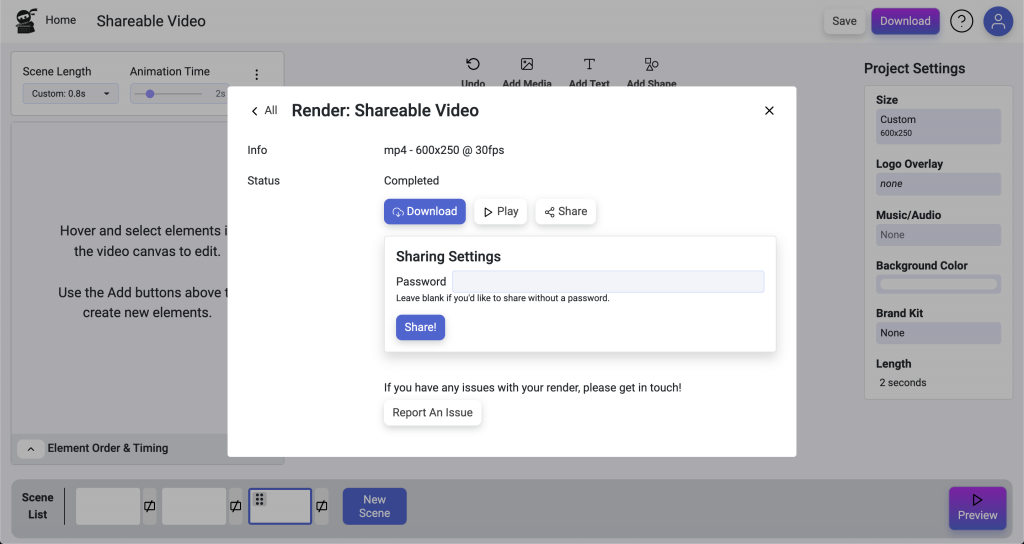
After you’ve rendered a video, we hope you’re excited to show your team, client, boss, aunt or whoever you share your videos with. Right next to the Download button, we’ve added a Share tool. It creates a link you can send to others so they can quickly view the video – no need to download and send files!
If you’d like a layer of privacy to restrict who can view your video, you can set a password so only those with the link and the password can access it.
We also track the number of views of the video, so you can see how many times it’s been watched.
Next to the Download button, there’s now also a “Play” button so you can see the full rendered video before you download or share it!

Sometimes, your mouse just isn’t enough. If you need pixel-perfect videos, or just want to speed up your workflow, a keyboard can be your best friend!
We’re releasing an initial version of shortcuts with the most common and useful actions available at the tip of your fingers.
Here’s the full list: (quick note – On MacOS, the Cmd/Command key is used instead of Ctrl)
Left/Right/Up/Down: Move the selected element 1 pixel using your arrow keys.
Shift + Arrow Keys: Need to move them farther? Use Shift + an arrow key to move the element 10 pixels.
Ctrl + Arrow Keys: Use the Ctrl/Cmd key with an arrow to change the width or height of an element by 1 pixel. You can combine this with the Shift key to change it by 10 pixels.
Ctrl + Z: Undo
Delete/Backspace: Delete the selected element.
Ctrl + S: Save your video
When you are using your mouse, you can now hold down the Shift key to disable snapping to the grid.
We also made plenty of smaller changes to make your life easier. There are too many to list, but here are a few.
Instead of one edit button, each option in the Project Settings (on the righthand side) is now directly editable which saves time and is less confusing.
We removed the title from Project Settings, you can now edit it directly at the top, in the nav bar, just click the title and change it.
We cleaned up the look of the timing bar, and now the points where an element animates in or out are indicated by the soft gradient at either end. Also, when an element is selected we now indicate this by highlighting it within the Element Timing & Order list.
Want your profile picture in a circle or your product image inside a star? We’ve added a quick shape crop feature so you can instantly crop your videos and images into exciting shapes to make your videos more fun. You’ll find it next to the “Media Size” options when editing a media element.
At Vidds, we constantly strive to make video creation quick, easy, cost effective, and as fun as possible. We’re excited about what the next 6 months will bring!
You, the Vidds Creators, keep us going. There is no better feeling than getting feedback and building tools that we know will help. So keep in touch, and let us know any time you find something to improve Vidds!
How to Use AI to Video Generator Click “AI to Video” in the Automations section To use the Vidds AI Video Generator, click the “AI
Create a video from a template Getting started There are two ways to get started with on of our pre-designed templates. Head to the “Templates”
Getting Started with Vidds The Dashboard – “Create” Section Above is the Create section – here you’ll find the most common videos you can create with Vidds.
| Cookie | Duration | Description |
|---|---|---|
| cookielawinfo-checbox-analytics | 11 months | This cookie is set by GDPR Cookie Consent plugin. The cookie is used to store the user consent for the cookies in the category "Analytics". |
| cookielawinfo-checbox-functional | 11 months | The cookie is set by GDPR cookie consent to record the user consent for the cookies in the category "Functional". |
| cookielawinfo-checbox-others | 11 months | This cookie is set by GDPR Cookie Consent plugin. The cookie is used to store the user consent for the cookies in the category "Other. |
| cookielawinfo-checkbox-necessary | 11 months | This cookie is set by GDPR Cookie Consent plugin. The cookies is used to store the user consent for the cookies in the category "Necessary". |
| cookielawinfo-checkbox-performance | 11 months | This cookie is set by GDPR Cookie Consent plugin. The cookie is used to store the user consent for the cookies in the category "Performance". |
| viewed_cookie_policy | 11 months | The cookie is set by the GDPR Cookie Consent plugin and is used to store whether or not user has consented to the use of cookies. It does not store any personal data. |